PointLightLab Tutorials
Tutorial - Using the Audiotrack Visual Editor
The visual editor for Audiotrack files provides a way to visualise the events in the audiotrack file and to visually sync them with a model file.
Finding the "Audiotrack Visual Editor " Tool
The tool is only available when an audiotrack file is open for editing. Clicking the "Visual Editor" button in the center of the editor form will open the audiotrack visual editor. This same button will open other editors when other file types are open for editing.
The editor displays a timeline which includes model frames at the top, milliseconds below and audio track events as heavy blue stripes.
There are options to add or remove audiotrack events and to set the properties of the event ( time and wav file name)
To assist with the syncing there is an option for setting the frame rate. This controls the ratio of model frames to milliseconds. Keep in mind that audiotracks are not synced to the frame rate, rather they are played at specified times.
Overview
In this tutorial we will create a new audiotrack and sync it to a model file. The model file we will use will be the Walker
Step 1 - Creating a new Audiotrack file
From the file menu, select "New", then "Audiotrack File"

You will see the tree view stocked with the default values for a new audiotrack file. This provides a very basic way to edit the audiotrack. Power users can get a lot done here. However when it comes to syncing with a model file, this is not ideal.
Step 2 - Opening the Visual Editor
Clicking on the "Visual Editor" button will now open the "Audiotrack Visual Editor" dialog. This tool allows you to visualise what the audiotrack will do along with editing it.
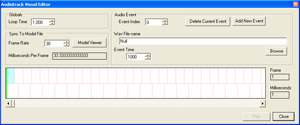
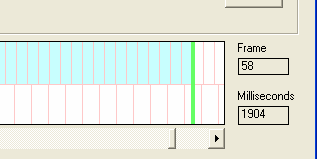
The main feature is the timeline which is divided into a number of cells. The cells on the top represent model frames, while the cells on the bottom represent blocks of 50 milliseconds. The scroll bar below the timeline provides control over the timeline cursor( the green bar). Try dragging the scroll bar back and forth. You can also click in the timeline to jump to a particular time code. You will notice as you move the cursor that the Frame and Millisecond readouts on the right hand side of the timeline change. These indicate the currently selected values under the cursor..
At the moment, you could add audiotrack events anywhere you choose. However we are here to create an audiotrack for a specific model file.
Step 3 - Viewing a Model File
On the left side of the dialog above the timeline is a group of controls labeled "Sync To Model File". These controls provide a mechanism to visualise the data in a model file against the data in the audiotrack file. The first value to pay attention to is the "Frame Rate" numeric box. This is by default set to 30; which represents 30fps. This value should be set dependant upon the frame rate that the model file will be played at in the PLLPlayer. The easiest way to discover this value is to play a script file in PLLPlayer and hit the F1 key during a stimulus display. (You may also like to hit the F2 key to pause the stimulus.) This will display the Information screen. On the Right hand side of which you will find the frame rate that the script is being played at. Keep in mind there are a number of factors that will affect the frame rate a script is played at. See the Manual for more discussions on these topics.
First lets open a model file. Click on the "Model Viewer" button to open the Model Viewer dialog. There is a whole tutorial on using the Model Viewer if you want to understand it a little better.
On the model viewer dialog, click on the browse button and select a model file to view. We will use one of the model files distributed with PointLightLab. Select "WalkerModel_L2R.pllm". If your copy of PointLightLab is installed in the default directory you will find this file in C:\Program Files\DuncansTools\PointLightLab\Data\. Select the file and click OK. You should now see a small cluster of dots displayed on a grey background. Depending on where you left the cursor in the Audiotrack viewer will determine which frame you currently see.
To make it easier to see all the dialogs on screen at a time, click on the "Hide Stats" button on the Model Viewer dialog. This will hide part of the dialog. This can be easily opened again by clicking on the same button. (Now called the "Show Stats" button)
Now if you look at the audiotrack editor again, you will notice that the top line of the timeline has been filled in with light blue blocks. These represent the frames in the model file. If you drag the cursor back and forth in the audiotrack timeline you will notice that the model viewer also changes to show the current frame that you have selected in the audiotrack editor.
If at any time you wish to hide the model viewer, just click on the "Close" button and it will be hidden. By again clicking the "Model Viewer" button on the audiotrack dialog it will show the Model viewer with the same settings as when you hid it.
Step 4 - Setting the Loop Time
Now that we can see the model frames relative to the audiotrack events, it should be quite straightforward to synchronise them.
You will notice that the blue frames go all the way from the left to the right in the audiotrack timeline. This may indicate that the audiotrack is not long enough. Adjust the loop time numeric box at the top right of the audiotrack editor dialog. Set it to 2000.
You can now see the right hand end of the frames.
Ideally if the stimuli that the model file and audiotrack are going to be used in will run longer than the model file, both it and the audiotrack will need to loop. In this case the loop time for the audiotrack needs to be at the end of the frames of the model file. So lets set the loop time to 1907 milliseconds.
Now lets add some audiotrack events.
Step 5 - Adding some Audiotrack events
Firstly you will notice there is an event already in the audiotrack file. This is created when you create by default when you make a new audiotrack file. You can either delete it or just change its values. We will delete it. Click the "Delete Current Event" button and it should disappear.
Scroll through the model file a few times to get an idea of the motion of the foot points. You will notice that the feel are traveling in a cycle. This is especially clear if you increase the Ghost Frames value to its maximum.
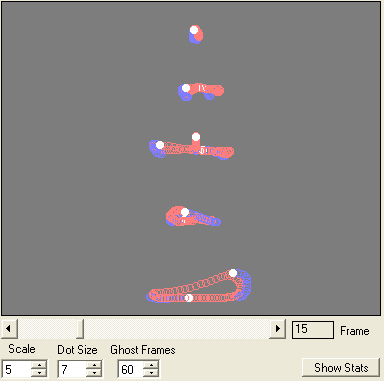
You can see that the feet move in a cyclical pattern. We need to identify where the foot comes to rest and create an audio event at that point.
At frame 1 you will notice that the lead foot is already on the ground and then slides along the ground for from left to right for the next 35 frames (approximately) then begins to lift. Meanwhile the other foot has been lifted and progressed through its rise and return to the front of the travel cycle before being placed on the ground again at about frame 37. This would result in a "footfall" sound. Between frames 37 and frame 60 the first foot has been lifted and has returned to the beginning of the cycle again resulting in a "Footfall" sound. We will now place audio cues at frames 37 and frame 60.
Move the cursor to frame 37 and click the "Add New Event" Button. This will insert a new event into the audio file at that time. (About 1218 ms) You will then need to select the sound you wish to play at that time. Click the "browse" button on the Audiotrack editor dialog and navigate to the sound file you wish to use. In our case we will use one of the sound files distributed with PointLightLab. If your copy of PointLightLab is installed in the default location you will find these in the C:\Program Files\DuncansTools\PointLightLab\Media\ directory. The file we will use is called "FootFall.wav".
Select this file and click OK.
You have now successfully added an audiotrack event. Repeat the process to add another event at frame 60 with the same wav file. (Time code 1972)

We can now close the audiotrack editor and return to the main editor window.
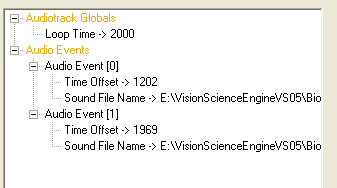
If you open out the nodes in the main editor window you will be able to verify that the settings you chose in the visual editor are present in this view.
Save the file by choosing "Save As" from the File Menu. Name the file "tut_audiotrack.plla" and put it into the \Samples\ directory. You will see a confirmation dialog once the file has been successfully saved. Here is a completed audiotrack file if you have not completed these steps successfully.
Step 6 - Creating a script file to test the audiotrack
We now want to create a script file that can display the model file and play the audiotrack file we just created. If you do not want to do this step you can download a completed script file.
Once you have saved the audiotrack file, create a new script file by selecting "New" from the file menu and "Script File" from the sub menu.
We want to create a single pattern layer and a single audiotrack layer in our new script. The pattern layer will display the model file and the audiotrack layer will play our new audiotrack.
To create the pattern layer, first select the "Script Block [0]" node in the tree view. This will select the first script block ( which is where we want to add things)
Next click on the "Script Tools" menu and select "Edit Pattern Layers", then from the sub-menu select "Insert Default Pattern Layer". This will insert a new pattern layer into the script block.
Open the pattern layer node so you can see the properties of the pattern layer.
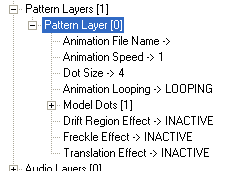
Click on the "Animation File Name" node to select it and then click the "Browse" button on the right hand side of the window. It will allow you to find the Model file that we used in the Audiotrack editor. If your copy of PointLightLab is installed in the default directory you will find the file (WalkerMode_R2L.pllm) in the C:\Program Files\DuncansTools\PointLightLab\Data\ directory. Select the file and click OK.
You will now notice that the file name and path have appeared in the text box next to the browse button. Click the update button midway down the window on the right hand side and the content of the text box will be committed to the "Animation File Name" property of the pattern layer.
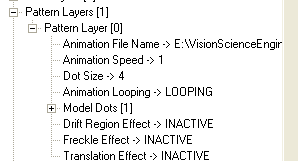
The next step is to add Model dots to the pattern layer. The number of model dots must match the number of dots in the model file. In our case 12.
With the pattern layer still selected, click on the "Script Tools" menu and select "Edit Model Dots". Click on the "Insert Default Model Dot" option. A new model dot has been added to the pattern layer. Now repeat this 10 more times. This is a little slow but is the only way. The next version of the PLLEditor will have a faster way to add model dots. Once you have 12 model dots in the pattern layer we can move on.
The other default settings for the pattern layer should be fine so we can move on to plugging in the audiotrack file that you created.
Step 7 - Adding the audiotrack file to the script file
Select the script block node again or one of its sub nodes and click on the "Script Tools" menu. Now select "Edit Audiotrack Layers", then "Insert Default Audiotrack Layer" from the sub-menu.
A new audiotrack layer should now have been added to the script block. Expand the node so you can see the properties of the audiotrack layer.
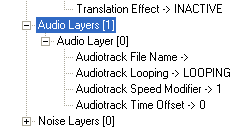
Now select the "Audiotrack File Name" node. Again click on the "Browse" button on the right of the window and find the audiotrack file that we created earlier. If you have saved it in the location specified it should be in C:\Program Files\DuncansTools\PointLightLab\Samples\tut_audiotrack.plla
Select the file and click OK. Again the file name and path appear in the text box next to the browse button. Click the update button and the filename will be committed to the audiotrack layer property.
We can now save the script file and test everything in PLLPlayer.
Click on the file menu and select "Save As". Save the file in the \Samples directory with the tut_audiotrack.plla file. Call this file tut_audiotrack.plls. NOTE the different file extensions.
Now to test the script select the "Script Tools" menu and choose "Test Script in PLLPLayer" at the bottom. PLLPlayer should start and run the script. If your computer has speakers or headphones remember to adjust the volume correctly to hear the audio cues.
Wrap up
The Audiotrack Visual Editor tool is an effective way to visualise the content of the model file with the content of the audiotrack file. Understanding the content of these two files will allow for easier synchronisation of the audiotrack events with the animation events.